Centrend

IT Tech Tips

Is Your Router Slowing Down Your Wi-Fi?

Your router is the box that connects your computers, phones, and tablets to the outside world. If your router is old or undersized for the number of devices you have, it can create a bottleneck. Here are a few essential things to keep in mind when assessing your router. These rules apply to home users or businesses alike, so read on! It’s not uncommon for me to hear a complaint from a client about slow internet connection speeds. When I plug my testing equipment directly into the Internet Service Provider’s device, I often see the full speed they are paying for. So what’s the reason for slow speeds beyond the provider’s gear? It’s often a fault of the Internet Router. The internet router is responsible for blocking unwanted/unrequested traffic from getting into your devices. A router provides basic firewalling services at a minimum. Simply stated: nothing gets in unless it was requested from the inside. This means that the router is VERY BUSY processing all the packets of information and deciding which ones should be let in and which ones should be dropped.  You can visit http://www.speedtest.net and see if you are getting the speed you are paying for. If not, here are the possible reasons: Your “off-the-shelf” router and not built for the number of devices you have connecting at once Your router is too old and can’t communicate at the speeds of your internet connection If Wi-Fi is slow, you may have a 54g network which is about 1/2 the speed of a 100MB speed modem Need help to figure out network performance problems? Reach out to me at the contact info below, and we’ll be glad to help!

Is Your Router Slowing Down Your Wi-Fi? Read More »

Internet Seem Slow? Consider this!

If you are using a laptop on a slow wireless connection such as hotel Wi-Fi or a cellular hotspot, your connection can slow to a crawl if you have installed cloud services such as Dropbox, Google Drive, and Microsoft’s One-Drive. Here’s how to limit how much resource the service uses, so you have room to do other things on the internet. Why does this happen? Cloud storage applications synchronize data in the background. There is plenty of room for them to do their thing on a typical high-speed connection while you use your computer. When you don’t have a fast connection, pausing or shutting off the service is not the best idea because you need to update the cloud with your changes. There is also a danger that you won’t remember to turn it back on, and the data you count on being accessible in the cloud won’t be there at all or won’t be the latest version you were working on. My advice is to tweak your application to limit how much of the internet connection the cloud application is allowed to use. If I’m using my Verizon hotspot, I generally set a download rate limit of 50 KB/s and an upload rate of 10 KB/s. This might be a good starting point for you. If you find it’s taking too long to finish syncing up, tweak the rate limits to your liking. Below are some screenshots of where to make this change in some of the most popular cloud services. If yours isn’t listed, you’ll probably be able to find it in the same general area of settings. Dropbox: Start by clicking the Dropbox icon in the bottom right of the screen in the taskbar.  Next, click the dropdown in the top right, then choose preferences. In Dropbox preferences, choose bandwidth.  Set a limit for both download and upload. Google Drive File Stream: Click the Google Drive icon in the taskbar. Click the Gear in the top right of the window, then choose Preferences. Click Network Settings in the bottom right of the settings window. Set a limit for both download and upload. Microsoft One Drive: Click the One Drive icon in your taskbar. Click the Help and Settings gear, then click Settings in the window that comes up. Set a limit for both download and upload. Is your computer slow all the time? You could have malware or a virus using up your bandwidth. It’s also possible that you need a tune-up. Reach out to us, and we’ll help you get your computer running as it should.

Internet Seem Slow? Consider this! Read More »

Why do my Spreadsheet Formulas Show Instead of the Result?

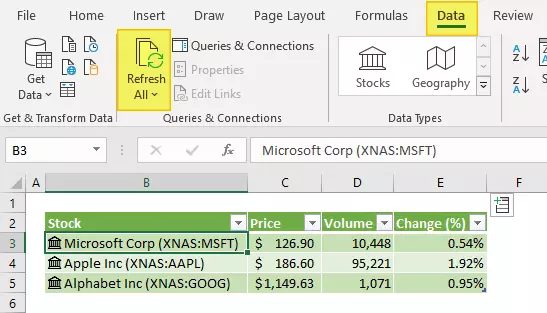
Have you ever been working on a spreadsheet and after entering a formula in a cell, you see the formula instead of the result? This article explains what happened and how you can get it back. This can happen in both Excel and Google Sheets, and I’ll explain how to troubleshoot and correct the problem in both applications. Google Sheets and Microsoft Excel contain spreadsheet auditing functions to “show formulas.” If ALL your formulas are showing up instead of the result of the formula, I recommend this as the first thing you would check: In Microsoft Excel: Click the Formula option on the toolbar Ribbon Click Show Formulas. This Toggles the display of all formulas on or off. Use it to troubleshoot/verify formulas when you are auditing a spreadsheet. In Google Sheets: Click the View option on the menu bar. Click Show Formulas to toggle the display of all formulas. Again, great for double-checking that your formulas are correct and consistent. But what if your problem is that only one particular formula is showing up while all the other formulas on the sheet are showing the result?  When this happens, you need to look closely at the cell by clicking it, then viewing the formula details in the editing section. Check out my image at the right, and you will see that it has the “force text” symbol, which is a single quote, in front of the formula. In both Microsoft Excel and Google Sheets: Once I remove that extra single quote, the formula displays the result instead. I hope you find this blog entry helpful! Check back soon for more great computing hints and tips. If you have any you’d like to share, please comment below.

Why do my Spreadsheet Formulas Show Instead of the Result? Read More »

How to Automatically Lock Your PC When You Walk Away

You should always secure your computer by locking the screen when you walk away. But sometimes in a rush, we forget to lock it down. This article shows how to set up an automatic lock so that when you walk away from your computer, your screen will lock itself! Keeping your PC wide open when you walk away leaves it available for anyone to mess with. So whether you are concerned about office pranksters or someone prying eyes seeing your information, it’s best to keep the workstation locked when you leave it unattended. Microsoft has included a feature in Windows 10 called Dynamic Lock that will automatically lock the workstation for you, should you forget to lock it yourself. The Dynamic Lock feature works by monitoring the computer’s connection to your cell phone. When it detects that the phone has moved away and is out of range, it locks your desktop for you. For this to work, both your phone and your computer must have Bluetooth connectivity. Almost all laptops have Bluetooth, and many desktops are also including it. If your system doesn’t already have Bluetooth, you can add a USB-connected Bluetooth adapter for about $12. Sound good? Let’s get you set up! Once you know your phone and PC have Bluetooth, the first thing you need to do is pair your phone to Windows 10. Confirm that Bluetooth on your phone is turned on. Then on your computer go to Settings > Devices > Bluetooth & other devices. From this screen, click Add Bluetooth or Other Device.  Then Click Bluetooth as the device type. After a moment or two of scanning, you should see your phone appear on the list. Below is an example of pairing my laptop to the Pixel 3XL. After I clicked Connect on the computer, I checked the PIN that was shown to be sure it was the correct one, and then I clicked Pair on the phone. Now the laptop is paired with the phone, and whenever I have my phone in proximity (about 33 feet), the two will connect.  Click Done to exit the connection screen. Now that your phone is connected via Bluetooth, we need to tell Windows to use its proximity to lock your system down. On your computer go to Settings > Accounts > Sign-in options. Scroll down to the Dynamic Lock section and check the “Allow Windows to automatically lock your device when you’re away” box. Now, assuming you have your phone on you and not on the desk when you walk away from your PC, your computer will automatically lock.  NOTE: There is a 30-second safety buffer that it must wait before locking your screen. If you or anyone else starts to use the computer, the screen will not lock. It’s best always to try to remember to keep your computer locked when you are away from it, but this is a great failsafe if you do forget to lock down your workstation!

How to Automatically Lock Your PC When You Walk Away Read More »

Non-profits Deserve the Best Tools – for Free!

If you work for or care about a non-profit organization, make sure they know about Centrend – and these strategies for obtaining the best software for free or nearly free. Corporations understand that investments in technology can make a huge difference in the success of their non-profit organization. After calculating Return on Investment (ROI) they can afford to wait a year or more for their technology investment to pay off. Non-profit organizations don’t have that luxury of waiting for a return on investment.   They have to maintain a positive cash flow to be successful. While the ROI can be terrific for businesses adopting new software technology, it’s harder to justify such expenses in the non-profit sector. As a turn-around specialist and business consultant friend of mine tells our clients, “No margin, no mission.” Fortunately, there are many opportunities to obtain top-notch information systems either free or at a minimum cost. The following list is what I consider the best of the best for Non-Profits. Start here to make sure you are obtaining the most cost-effective technology for your non-profit: Tech Soup – Tech Soup is the premier platform that lets businesses like Microsoft donate software licensing and subscriptions to non-profits. There is a minimal fee for TechSoup to administer the licensing, but the cost ends up being pennies on the dollar. You can also get recycled/off lease hardware from them very inexpensively though in our experience, the quality of the hardware has been inconsistent. Gsuite for Non-Profits – Google has a very generous program for Non-Profits that allows you to use the entire Gsuite for up to 49 users, completely free!  You can have 30 gig of storage for each user, plus use team drives for document collaboration. Google can host your entire domain name for free and having their reliability for email gives your non-profit a great advantage at no cost. SalesForce.com – Salesforce.com’s “Nonprofit Success Pack” provides a set of advanced Customer Relationship Management (CRM) tools for managing constituents and donors. It’s not free, but the price is significantly reduced and it’s a very robust set of tools. Donorbox.org – Donorbox.org is an automated, recurring donation management system. You can use the system absolutely free to raise up to $1,000 a month. After that, they charge a nominal fee of 1.5% to pay for the cost of the platform.  MailChimp and ConstantContact – They offer complete email marketing solutions for keeping in touch with donors and creating brand awareness. Both services are good and offer discounts for non-profits, but MailChimp will ultimately cost less than ConstantContact for nearly the same feature set.  The list above will be a great place to get started when looking at software options for your non-profit organization. They will require you to show a copy of your 501c3, Federal Tax ID/EIN, and unless you are brand new, a copy of your tax return for the previous year.   If you have favorite resources for non-profits, please feel free to add them to the comments below. If you need help getting some of this in place, Centrend may be able to donate consulting services. Please reach out to us and let us know how we can help your mission succeed! 

Non-profits Deserve the Best Tools – for Free! Read More »

How to Protect from Word and Excel Crashes

There is NOTHING worse than having worked on an Excel Spreadsheet or written something in MS Word and then had to redo it because of a power loss or application crash. You can avoid this frustration by following a few quick and easy precautionary steps. So How Do I Protect from Microsoft Word and Excel Crashes? The most critical piece of advice I can start with is to save early and often, especially before your print. I don’t know if it’s due to Murphy’s Law, or if there is some science behind the fact that programs tend to crash when the document is sent to print. To protect yourself between saves, launch the Office application and follow this process: Click File. Click Options. Click Save on the menu bar. Make sure that “Save AutoRecover information every 10 minutes” is checked. Make sure that “Keep the last autosaved version if I close without saving” is checked. Click OK. Now you are protected! If the Microsoft application crashes or if you exit and say “Don’t Save” when it asks if you want to save, you will be prompted with a screen such as the following to recover the file at the last checkpoint! I’ve shown you how to establish Autosave using Microsoft Word. You don’t need to set up autosave for each document, but you do need to set autosave up for each application. Configure autosave for each of your Microsoft programs, and you significantly reduce the amount of data loss that can occur. Note: This article assumes you are using a Microsoft Application such as Microsoft Word or Microsoft Excel and are saving data to a local hard drive or USB memory stick. If you are saving to a cloud service such as Dropbox or Google Drive, backup versions of the file (revisions) are automatically saved for you and can be recovered through that program’s interface.

How to Protect from Word and Excel Crashes Read More »

Scroll to Top