Technology Tips By Centrend Podcast: Episode #5
With the scarcity of computers right now and the need for additional computers for remote working and remote learning, many folks are dusting off their old Windows 7 computers. The problem is, you may not remember the password to it. In this blog entry, I show you how to recover a Windows 7 password, without a recovery USB stick.
While it’s not ideal to use Windows 7 computers as they are no longer under support and may have unpatched security vulnerabilities, it may be necessary to get you through the pinch.

The first step is to click the bottom right corner to shut Windows down.

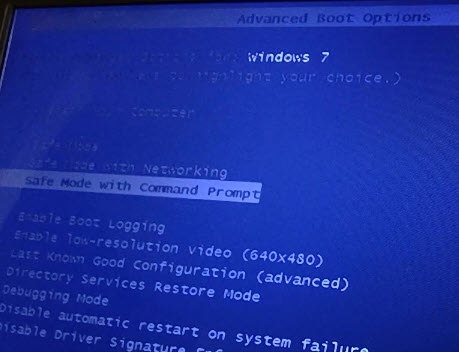
Turn the computer on and immediately being rapidly pressing the F8 key. A menu should appear like the one below. Use the arrow keys to arrow down to Safe Mode with Command Prompt.
Press Enter and Windows starts in a special boot mode. If the Administrator account had been already activated, we would see an option here to change users. Since no additional account appears that we can switch to, we will be able to boot to alternate media and turn on the hidden administrator account!

You’ll need media to continue. While modern Windows 10 computers don’t usually come with any media, many if not most Windows 7 computers shipped with either a DVD or a USB stick. If not, contact us and we can help you find media to use for recovery.
Shut the computer off again. Insert your recovery media into the DVD player or the USB stick into a USB slot. Turn the computer back on and this time rapidly press the F12 key for a boot options menu. Note: Some computers don’t use F12. If F12 doesn’t work for you, watch your computer’s screen for a hint. It could be Del or F2 key for example.
Use the arrow keys to select the media you inserted. This could say DVD or USB. Press Enter. As soon as you press enter, you’ll be prompted “Press any key to boot…” Press a key such as Enter to get the computer to boot the recovery media instead of your internal hard drive.
You’ll see a message “Windows is loading files…”

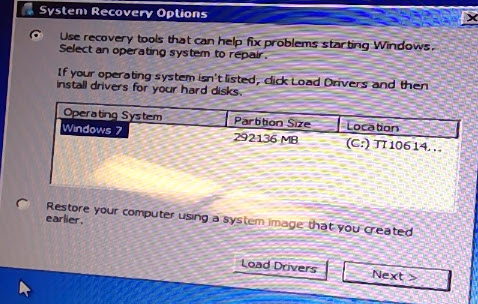
It will look like it’s a brand-new install of Windows 7. Choose the default language, then click next. When the install/repair menu comes up, click Repair your computer.

After a few minutes, you will be presented with a menu to choose the operating system. Click Next.
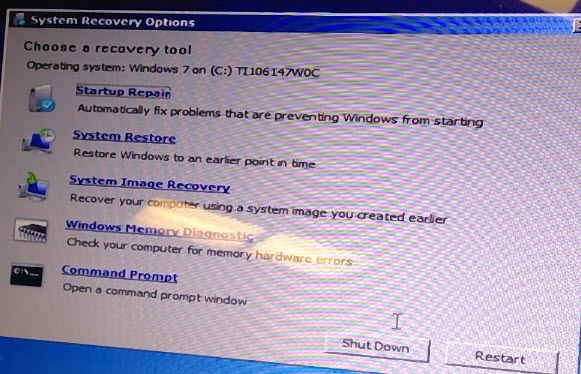
Now for the recovery option, choose Command Prompt.
When the command prompt opens, type the following and press the Enter key:
net user administrator /active:yes
You should get a reply that the command was completed successfully.
Type Exit and press the Enter key and you’ll be back at the System Recovery Options menu.
Click Restart to restart the computer normally. You will not press anything at boot-up this time. If you end up in Recovery mode again, remove the media and restart the computer to boot normally. Once you boot normally, you will see both the original user ID along with an administrator login that you can choose.

Choose Administrator to log into that account. You won’t be prompted for a password because we didn’t set one. All we did at the command line was activate the account.
It will take a few minutes for the administrator profile to be created. Once you see the desktop, we can set the password on the account we want to use with the computer. In this example, the name of the account is Mark.
Click the start bubble at the bottom left, then go into the control panel.
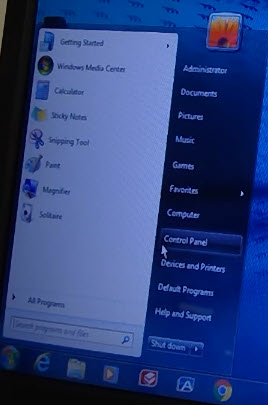
Next, go to User Accounts, the Add or Remove User Accounts.
Click the account name you want to reset the password on.
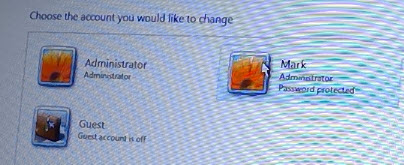
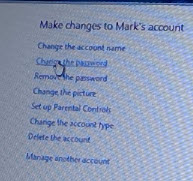
Now you can click either Remove the password or Change the password.
Now restart the computer and you will be able to get right into your usual user profile again! Be sure to either disable the administrator account or set a password for it to keep your computer secure.
If you get stuck at any part of this process, give us a call or submit our consulting form for a quick free assessment of your situation.